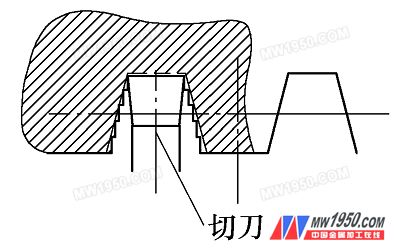
In the principle of minimizing the exchange of gears, we try to use the original machine tool to exchange gears, so z1 and z4 still take 45, 90-tooth exchange gears, then 45 /z2 ×z3 /90 = 50 /48 × 1 /2, ie P /P1 = 50 /48. Considering the machine tool hanging space, we chose z3 for 75 and z2 for 72 teeth, that is, Figure 2 is a row of 72 × 75 /90, and the nameplate has a pitch of 48 mm. In the case of semi-finishing, the diameter of each of the matching shaft diameters is maintained at a large diameter of 1. 5 to 2 mm, and the tooth profile is rough, and the tooth roughing is completed in the order shown in Fig. 2. Since the screw is a slender shaft structure, it is processed by a cutter with a turret for semi-finishing. The surface of the thread should have a finishing amount of 1.5 to 2 mm, and the tip of the tailstock should be relaxed at the appropriate time.

Figure 2 row diagram
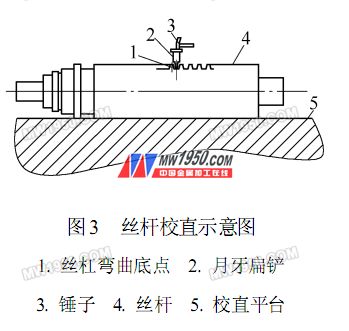
Natural aging, rebound hammering method straightening: due to the large residual internal stress after quenching and tempering, and the workpiece is an elongated shaft structure, it is very easy to deform. Therefore, natural aging measures are taken after semi-finishing to further eliminate internal stress, and the deformation of the workpiece caused by semi-finishing is eliminated by the rebound hammering method, as shown in Fig. 3. Then on the lathe, the large diameter of the thread is 0mm, and the finishing is finished.

Figure 3 Schematic diagram of screw alignment
Finishing car: The thread diameter of the boring machine should be adjusted to the size, and then the small tool holder can be adjusted to the size according to the tooth shape and the tooth distance model. At this time, the turning tool should be shaped according to the toothed plate, but the shape of the cutting edge should be narrower than that of the toothed shape, and the 0. 05mm feeler is not acceptable for the test of the tooth shape. Pay attention to the use of cutting fluid to cool the tool during machining to ensure the accuracy of tooth profile and pitch. After the tooth shape is qualified, the upper part of the upper milling machine is processed to meet the pattern requirements.
2. Machining of nuts (1) Structure and technical requirements of the nut The structure of the nut is shown in the shape of a hexahedron. The two sides have a slot on both ends of the key groove. The main technical requirements are: Nut shape × (246 ± 0. 1) mm × 300mm. The thread is 300mm long, the end face is perpendicular to the axis of 0. 05mm, the two side grooves are 0 mm, the parallelism is 0. 05mm; the nut material is ZCuZnAlFe3Mn3, the internal thread is a double-line trapezoidal thread, the large diameter is 0 mm, the medium diameter is 112. 5mm, the small diameter 0 mm, lead 50 mm, pitch 25 mm, tooth angle 30°; each pitch error ± 0. 02mm, cumulative pitch error per 0.8 pitch ± 0. 04mm; threading with standard taps (samples) .
(2) Main processing difficulties The nut is made of copper, has large thermal expansion coefficient, is easy to deform, and has long thread. The machining arbor is easy to deform and tremble on the eating knife and its own weight, causing fluctuations on the thread surface; special pitch lead is large, various The position and position accuracy is high; the double-line trapezoidal thread must be strictly accurate and must be controlled by the sample.

Figure 4
| Previous page | 1 | 2 | 3 | Next page |
Door Bolts, Brass Door Bolts, Interior Door Bolts, Security Door Bolts
ONLY DOOR GROUP Ltd , http://www.doors-only.com