First, the function and structural characteristics of the box parts
The box type is the basic part of the machine or component. It assembles the shaft, sleeve, gear and other related parts in the machine or component into a whole, so that they maintain the correct mutual position between them and coordinately transmit according to a certain transmission relationship. Exercise or motivation. Therefore, the quality of the processing of the cabinet will directly affect the accuracy, performance and life of the machine or component.
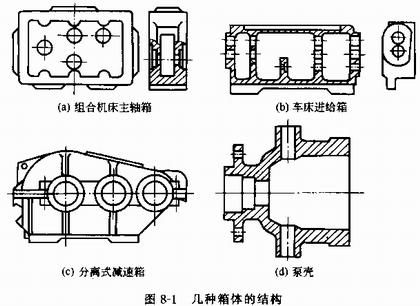
Common box parts are: machine headstock, machine feed box, gearbox body, reduction box body, engine block and base. According to the different structural forms of the box parts, it can be divided into the whole box, as shown in Figure 8-1a, b, d and the separate box, as shown in Figure 8-1c. The former is integral casting and overall processing, and the processing is difficult, but the assembly precision is high; the latter can be separately manufactured, which is convenient for processing and assembly, but increases the assembly workload.
Although the structure of the box is various, it still has the common main features: complex shape, thin and uneven wall, cavity shape inside, many processing parts, difficult processing, and high precision system. In the plane, there are also many fastening holes with lower precision requirements. Therefore, the machining labor for general-purpose machine tool manufacturers for box-type parts accounts for about 15% to 20% of the total product processing.

Second, the main technical requirements, materials and blanks of the box parts
(1) Main technical requirements for box parts
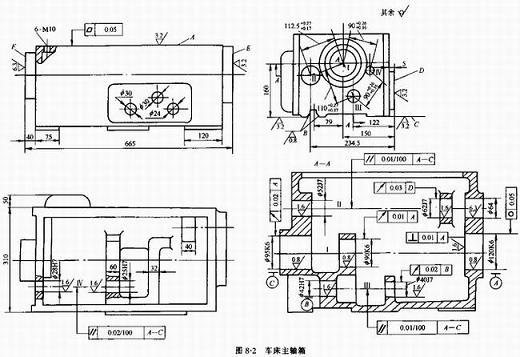
Among the box parts, the precision of the machine headstock is the highest. Taking a lathe headstock as an example, as shown in Figure 8-2, the technical requirements of the box parts can be summarized as follows:

1. The shape accuracy and surface roughness of the main plane
The main plane of the box is the assembly reference, and is often the positioning reference during processing. Therefore, it should have higher flatness and smaller surface roughness value. Otherwise, it will directly affect the positioning accuracy of the box processing, affecting the box. Contact stiffness and mutual position accuracy when the body and the base are assembled.
Generally, the flatness of the main plane of the box is 0.1-0.03 mm, the surface roughness is Ra2.5-0.63 μm, and the perpendicularity of each main plane to the assembly reference plane is 0.1/300.
2. Hole dimensional accuracy, geometric accuracy and surface roughness
The dimensional accuracy, shape accuracy and surface roughness of the bearing support hole on the box are required to be high. Otherwise, the matching precision between the bearing and the box hole will be affected, the rotation precision of the shaft will be reduced, and the transmission member will be easily The gear) produces vibration and noise. Generally, the spindle support hole of the machine tool spindle has the dimensional accuracy of IT6, the roundness and cylindricity tolerance does not exceed half of the aperture tolerance, and the surface roughness value is Ra 0.63 to 0.32 μm. The remaining support holes have a dimensional accuracy of IT7 to IT6 and a surface roughness value of Ra2.5 to 0.63 μm.
Next page
Furniture Grade Plywood,Furniture Grade Melamine Plywood,Marine Grade Plywood
Plywood material can be used for different parts of a structure.
Plywood is a material manufactured by layers of wood veneer.
It may have from 9 to 11 different layers.
It has characteristics of crack,twist,warp,break and shrink resistance .
Plywood Wall Panel,Melamine Plywood,Marine Grade Plywood,Furniture Grade Plywood
CHANGZHOU ART DECORATION MATERIALS CO.,LTD , https://www.cnartdecor.com